
Your clients aren’t paying for yesterday’s news. They need real-time insights to justify their ad spend and build confidence in your agency.
Fresh, reliable data isn’t a nice-to-have. It’s how marketers make the right decisions and show clients their ad dollars are in good hands. Basically, it’s how they stay in business. This guide will explain how to ensure both fresh and accurate data in client reporting. We’ll give you simple steps to use Looker Studio’s tools for the freshest data, without slowdowns or cost hikes, to help your agency and your clients succeed.
What Does Data Freshness Really Mean?
Data freshness ensures your reports reflect the latest performance of your marketing campaigns. In Looker Studio, customize refresh settings to update reports at intervals ranging from every 15 minutes to every 12 hours, depending on your data source.
Fresh data helps marketing agencies make better decisions, stay flexible, and keep clients in the know. Running a social media campaign? Set Looker Studio to update hourly, track engagement in real-time, and tweak your bidding strategy as needed.
Up-to-date data makes your reports more accurate, which helps you focus efforts where they matter most. Plus, sharing fresh insights with clients shows you’re paying attention and aren’t afraid to show actual results, which builds trust and fosters long-term partnerships.
How to Check if Your Data is Fresh
You might want to quickly check data freshness from time to time, to ensure reports are fetching the right data on time. This helps you:
See the newest numbers: Quick checks tells you if your reports show the most up-to-date info for making smart choices.
Confirm changes: When you update the original data, a quick check makes sure those changes are now in your reports.
Check freshness first: If the numbers seem off, see if the report has updated recently—that’s often the problem.
Keep clients happy with fresh info: Up-to-date reports build clients’ trust.
Make sure updates are happening: Even if you set automatic updates, a quick peek confirms they’re working right.
Know if the data is truly live: Sometimes there’s a slight delay; checking shows you how current the info really is.
Confirm your own updates worked: When you manually update, a quick check says “yep, it’s done.”
Catch problems early: Regular quick checks can spot data issues before they cause big headaches.
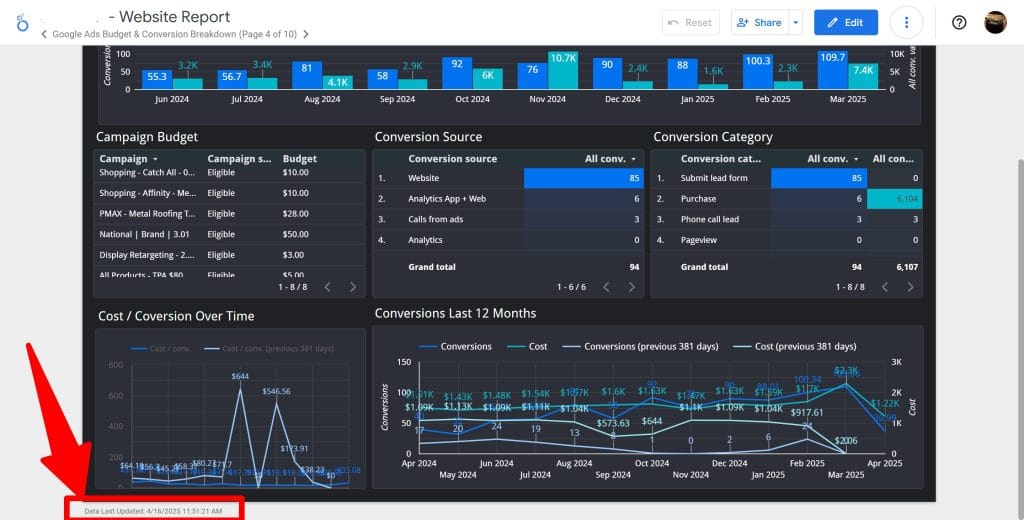
Here’s now to check the freshness of your data in Looker Studio:
- Open the report.
- Look for the Last updated timestamp in the bottom left corner
How to Manually Refresh Looker Studio Reports
Sometimes waiting for scheduled refreshes won’t cut it, like when you need the latest data right away. Looker Studio makes manual refreshes quick and easy.
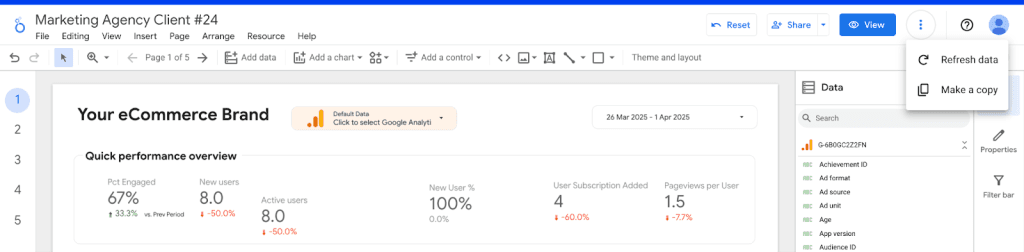
To get up-to-date data from your connectors on Looker Studio:
- Open the report in Looker Studio.
- Click the three dots in the top-right corner.
- Click the Refresh data button.
The report will instantly reload with the most recent data from all connected sources.
Refresh Just One Data Source
Need to update just one dataset, like Google Ads or BigQuery? Refresh it without reloading your whole report:
- Go to Resource in the top menu.
- Select Manage added data sources.
- Find the data source and click on it.
- Press the Edit icon.
- At the bottom, press the Refresh button.
- Wait a moment and then press Continue.

When to Use Manual Refresh vs. Scheduled Updates
Scheduled refreshes work fine for standard reporting, but fall short when speed and quick adjustments are key. During product launches or time-sensitive promotions, on-demand access to fresh data helps marketers keep tabs on results and adjust quickly.
Manual refreshes give you instant insights based on the latest numbers, allowing quick tweaks to improve results when every minute counts.
Problems to Avoid with Manual Refreshes
While manual refreshes save the day for time-sensitive campaigns, they can backfire if over used. Watch out for these common pitfalls:
Watch Out for Duplicate Data
If you refresh without the right settings, you can end up with duplicate data—especially if your team is using the same connectors or pulling info from different places. These duplicates can inflate numbers and skew results, which can lead to unrealistic strategies that will likely fail.
Keep Data Quality High
Manually refreshing data makes it easier to mess things up—think typos, missing info, or weird formatting. Set up regular check-ins and use automation tools to help keep things clean and accurate.
Stick to Regular Reporting Times
Random refresh schedules—like once in the morning and then not again for two days—make it really hard to spot trends. Stick to a regular schedule so your performance comparisons make sense.
Don’t Over-Rely on Manual Work
Try not to waste time collecting data by hand. Exporting from different channels and building spreadsheets is a common drain on teams’ time and energy. Automate when possible in order to spend less time prepping reports and more time gaining insights.
Learn more about handling data for better insights.
Set Up Scheduled Refreshes
Another thing to keep in mind while building your Looker Studio reports is scheduled data refresh options. To find the sweet spot between reporting costs and data freshness, start by understanding how often your data actually changes.
Find the Right Refresh Rate for Each Connector
Different data connectors in Looker Studio offer different data freshness options. Here’s a quick guide:
| Data Connector | Available Refresh Rate |
|---|---|
| Amazon Redshift | Every 1-50 minutes or 1-12 hours (default) |
| BigQuery | Every 1-50 minutes or 1-12 hours (default) |
| Google Analytics | Every 1, 4, or 12 hours (default) |
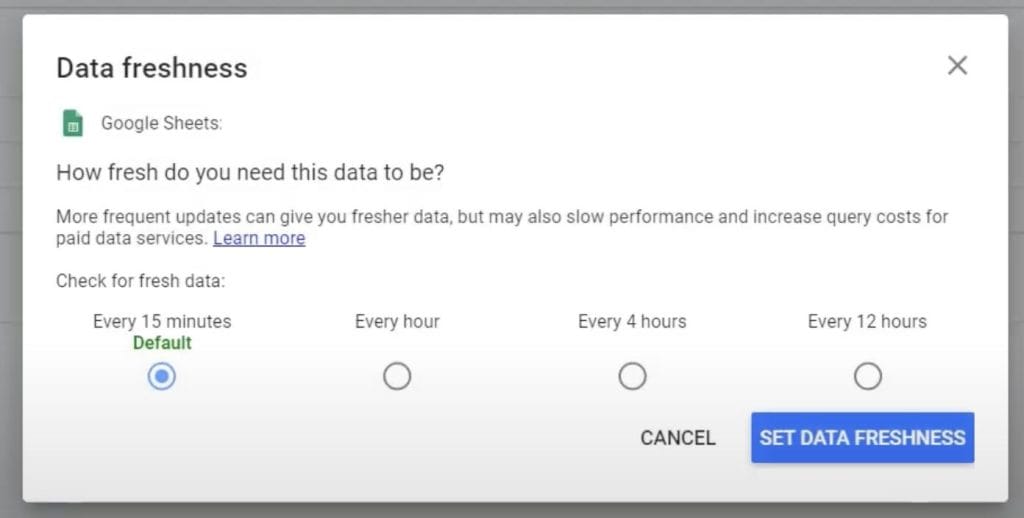
| Google Sheets | Every 15 minutes (default), 1, 4, or 12 hours |
Heads up: some Google platforms and tools, like Google Ads and YouTube Analytics, have a fixed refresh rate of every 12 hours, which users can’t change.
Balance Refreshes With Performance and Cost
Real-time updates give the freshest insights but drain resources and budget fast. Before increasing refresh rates, ask yourself: does this client really need minute-by-minute snapshots?
| Data Frequency | Example |
|---|---|
| Frequent updates | For real-time social media or eCommerce analytics, refresh every 15 minutes to see current performance. |
| Moderate updates | For daily ad performance metrics, refresh every few hours – hourly updates provide no extra value. |
| Infrequent updates | For monthly performance summaries, a daily refresh is plenty. |
Use Auto-Refresh in Looker Studio Pro
Another handy feature Looker Studio users should know is auto-refresh. Different from data freshness, it helps agencies get real-time data from multiple channels with no need to manually refresh.
Auto-refresh is helpful in cases where reports display continuously and must show the freshest available data. You see this with live dashboards for real-time monitoring, such as marketing campaign performance tracking, website traffic reports, or social media engagement.
Say your agency manages multiple ad campaigns with a live dashboard tracking spend, click-through rates, and conversions. With 15-minute auto-refreshes, your team makes constant tweaks based on fresh metrics, greatly improving ROI without lifting a finger.
Find out how to choose an automated reporting tool.
Set Up Auto-Refresh in Looker Studio
Set up automatic data refreshes to update you dashboards with no manual work. This Pro-exclusive feature is turned off by default, but you can turn it on seconds:
- Open the report.
- In the Resource menu.
- Select Manage auto refresh settings.
- Enable Automatically refresh report data.
- Choose a refresh interval from the available options.
- Click Save to save the auto refresh settings.
No Pro subscription? Adjust your basic data freshness settings instead:
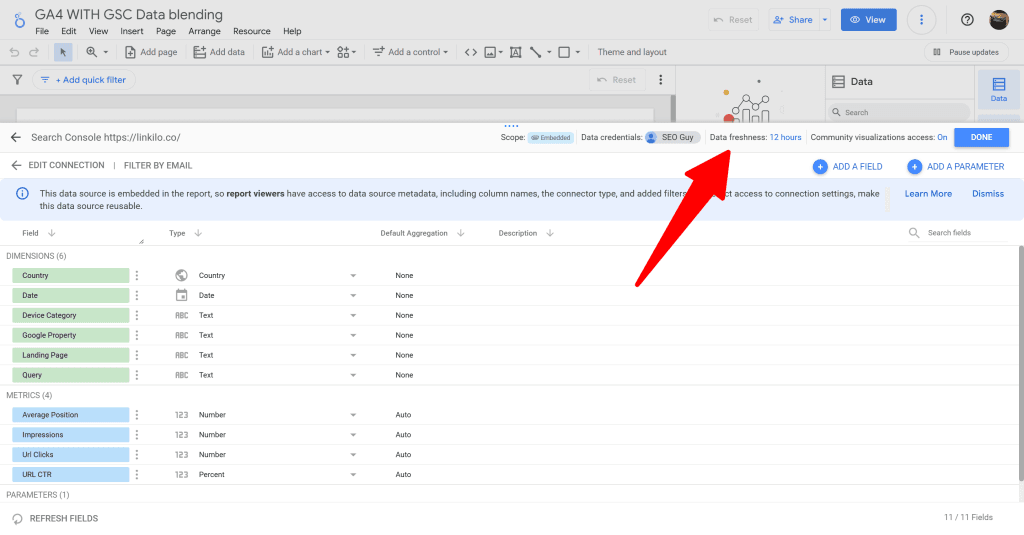
- Open the report you want to adjust.
- Click on Resource.
- Select Manage added data sources.
- Choose the data source and click the Edit button.
- Find the Data freshness setting in the top bar and click on it.
- Select the preferred data refresh period.
- Click the Set data freshness button to save the settings.
Fix Common Auto-Refresh Issues
Without auto-refresh, your team wastes time reloading reports by hand—and that delay can end up hurting campaigns. But working with auto-refresh isn’t always easy either. Watch out for these two common problems:
Auto-Refresh Is Not Real-Time Updates
The #1 misunderstanding: thinking auto-refresh delivers instant data. In reality, your data’s freshness depends on your connector’s refresh settings. If Google Analytics refreshes every 12 hours, setting a 5-minute auto-refresh just reloads the same data until the next scheduled GA update.
Auto-Refresh ≠ Real-Time
| Feature | Auto-Refresh | Real-Time Data |
|---|---|---|
| Update Frequency | Set intervals (e.g., every 5 mins, hourly, daily). | Near-instant updates. |
| Data Latency | Can have a delay depending on the refresh interval. | Minimal to no delay. |
| Setup | Built-in Looker Studio Pro feature. | Requires specific data sources and connection methods. |
| Cost/Resources | Generally lower cost and resource usage. | Can be more resource-hungry and potentially costly. |
| Use Cases | Reports that need reasonably up-to-date data (e.g., daily website metrics, hourly campaign performance overviews). | Dashboards requiring immediate insights (e.g., live event monitoring, stock market data). |
| Availability | Looker Studio Pro users only. | Depends on the data source and connector capabilities. |
Don’t Refresh Too Often
Refreshing your data too often can waste budget and actually slow things down. Looker Studio community users say their reports lag when they set frequent updates on live data sources like BigQuery or Redshift—sources that charge for every data pull. Settle on a refresh schedule that keeps things up-to-date without draining your system or wallet.
Keep your reports up-to-date by knowing the difference between refreshing data and refreshing data source fields.
Data vs. Data Source Fields
Refresh data to update the information in your reports with the most recent data, with no changes to its structure. For example, to update your campaign data, simply hit refresh on the data.
If you change the structure of your data connector, refreshing the data alone won’t show the changes. For example, if you add a new column to a Google Sheet connected to Looker Studio, you need to refresh the data source fields for Looker Studio to recognize the new column.
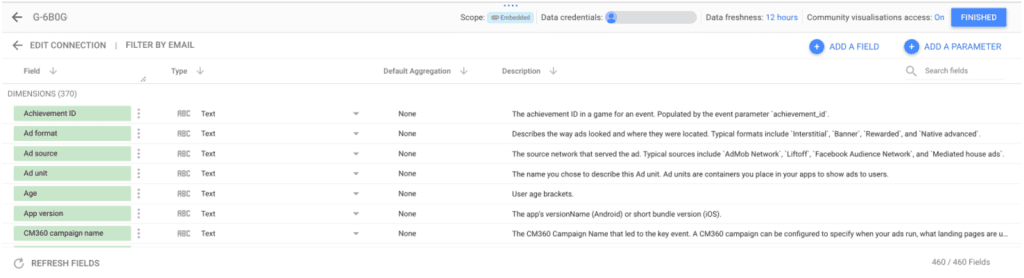
Refresh Data Source Fields
To refresh fields, start by accessing the data source:
- Open your Looker Studio report..
- Click on any report widget to open the Setup panel on the right side.
- In the Data Source section, click the Edit data source button.
Now, refresh the fields:
- In the data source editor, scroll to the bottom left and click Refresh fields.
- Looker Studio will reload the data source and fields, and show any new changes from the original dataset.
Review the list of changes—new fields will be added, removed fields deleted, and renamed fields will appear as new ones.
- Click Apply to save the changes.
After applying changes, check your reports for errors or broken elements. If there are major changes, adjust or remake charts and calculated fields.
Risks Related to Field Changes
Even after making changes to your original dataset and refreshing fields in Looker Studio, watch out for these issues in your report:
- Broken calculated fields – if a custom field references a renamed or removed column, it will break and show an error. You’ll need to edit or recreate these fields to fix them.
- Disrupted charts and visualizations – charts using modified or deleted fields may fail to load or show a Data Set Configuration error.
- Unintentional data loss – removing fields from the data source deletes any related data in your reports.
Limits of Looker Studio Data Connectors
To integrate data sources, knowing refresh rates is just the first step. After that, look at the limitations of popular data connectors.
Amazon Redshift Connector
The Amazon Redshift connector helps agencies visualize and analyze data from Redshift data warehouses, especially for larger datasets.
However, it has a query limit of 150,000 rows. Going over that number can cause data truncation and incomplete analyses.
Also, field names must use only ASCII characters. Non-ASCII characters are unsupported, aren’t supported, so you may have to change data schemas.
The Looker Studio community recommends Amazon Redshift connectors for datasets under 100,000 rows.
BigQuery Connector
BigQuery integration with Looker Studio helps marketing agencies handle large-scale data analysis. The connector can handle up to 2 million rows—great for heavy dashboards and reports.
However, going over this limit causes data errors without warning, which can be a big problem for agencies relying on BigQuery data for reporting.
Google Analytics Connector
The Google Analytics connector in Looker Studio lets agencies track website performance metrics right in their reports.
However, Google Analytics has daily and hourly data request limits. Going over quota can cause frustrating delays or errors.
Google Sheets Connector
Connecting Google Sheets to Looker Studio is great for cross-team projects with frequent updates. It’s ideal for small to medium datasets, ensuring smooth performance for all users.
Despite its pros, larger datasets can result in slow loading times and the infamous System error message in Google Sheets widgets.
Keep in mind that data freshness requires manual refreshes or scheduled triggers, so it may not be the best choice for reports that need real-time data.
| Connector | Amazon Redshift Connector | BigQuery Connector | Google Analytics Connector | Google Sheets Connector |
|---|---|---|---|---|
| Best For | Visualizing & analyzing larger Redshift data warehouses (<100k rows recommended). | Large-scale data analysis for heavy dashboards and reports (<2M rows). | Tracking website performance metrics. | Cross-team projects with frequent updates (small to medium datasets). |
| Row Limit | 150,000 rows | 2,000,000 rows | Subject to Google Analytics data request limits (daily & hourly). | Slows down with larger datasets. |
| Over-Limit issues | Data cut-offs and incomplete analyses. | Data errors without warning. | Delays or errors. | Slow loading times and potential “System error” messages. |
| Data Freshness | Assumes data is fresh within Redshift. | Assumes data is fresh within BigQuery. | Depends on Google Analytics data processing. | Requires manual refreshes or scheduled triggers (not real-time). |
| Key Weaknesses | Potential data loss with larger queries. | Silent data errors with large datasets. | Potential for quota exhaustion and reporting delays. | Performance issues and lack of real-time data for large datasets. |
Data Refresh Best Practices
Your agency’s Looker Studio reports are only as good as your data. The best looking client report can’t make up for stale data, so choose your refresh rates wisely.
Schedule Refreshes
Try to match data refresh times with the frequency of actual data changes. Frequent refreshes may look like a good idea at first, but can needlessly overload a system and raise data handling costs.
For instance, if you have a daily sales report, schedule it to refresh every morning. Looker Studio allows you to control data freshness settings for most data sources, so you can balance data freshness with campaign needs.
Update Data on Off-Peak Periods
Schedule data refreshes during off-peak hours to avoid system drain and performance glitches, and ensure that reports are ready with fresh data during busy usage times.
This approach is ideal for large datasets or complex reports requiring a lot of processing power, or when third-party connectors charge for each data refresh.
Use Data Caching
Caching stores query results for a set time—useful when frequent refreshes for a data source aren’t needed. This lowers database load and keeps report interfaces running smooth, as Looker Studio uses cached results of your SQL queries.
Use Extracted Data Sources
For static or slow-changing datasets, extracted data sources can boost Looker’s performance.
The Extract Data connector in Looker Studio takes a static snapshot of your data and securely stores it on the platform. This method reduces live data queries, which improves report loading times. Keep in mind that extracted data sources have a size limit of 100 MB and only update manually.
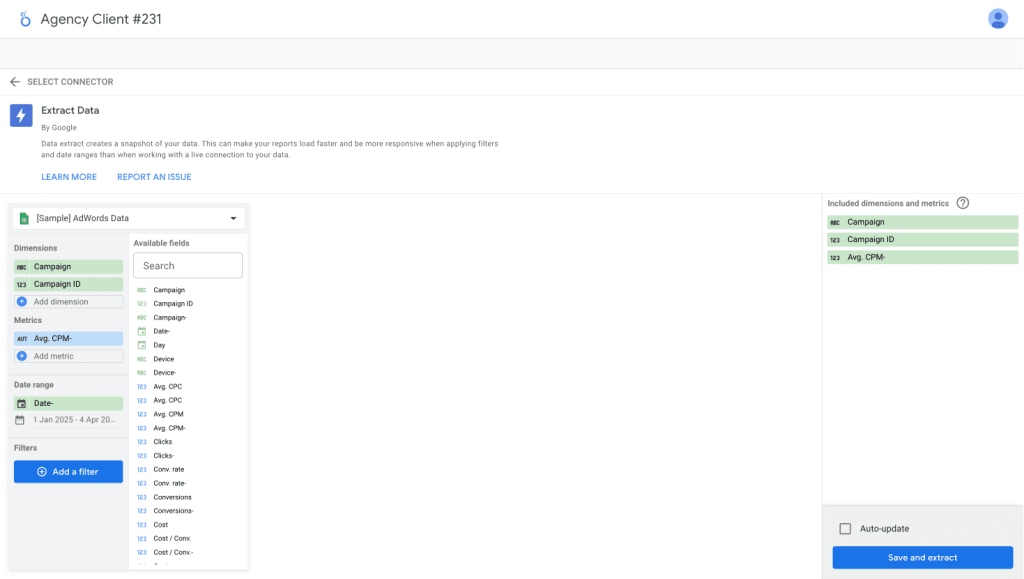
Integrate the Extract Data connector into your agency’s report:
- Click Blank report to create a new report or choose an existing one.
- Select your data source.
- In the report, select Add data in the top menu.
- In the Data sources tab, search for Extract data and select it.
- If needed, authorize your connection.
- Choose the source to extract data from—for example, Google Analytics 4, BigQuery, or Google Sheets.
- Click Next, then Add dimension and select fields, like Page fields, etc.
- Click Add metric and choose numerical data, like Sessions.
- Apply filters, if needed, by clicking Add a filter.
- In the Date range, select the time period for your data.
- Under Auto update, enable scheduled updates if you want the extracted data to auto-refresh.
- Click Save & extract to save changes and start data extraction.
The report will then feature static data you can manually refresh as needed.
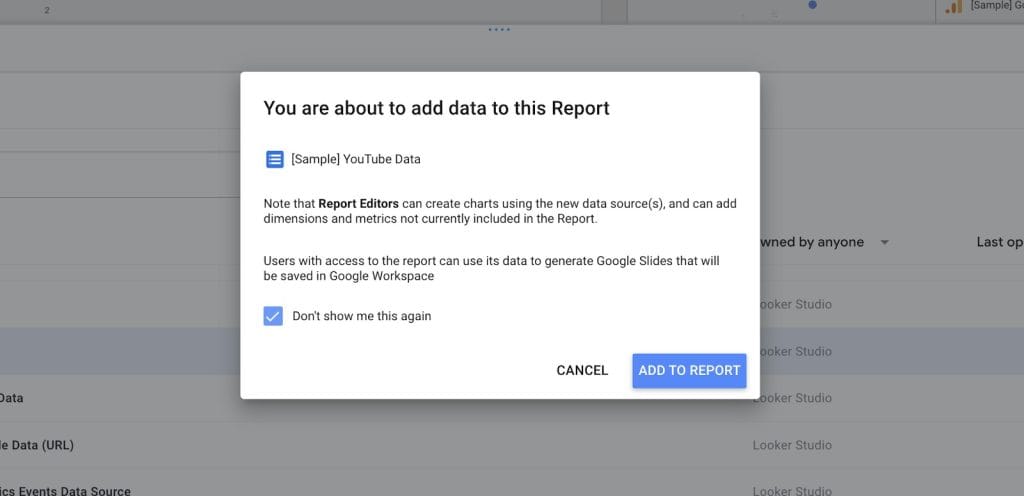
Streamline Multiple Reports With Reusable Data Sources
With reusable data sources, multiple reports can access the same dataset without actually fetching the same data. This saves time and resources and ensures consistency across reports.
To use the same data connector in a different report:
- Open the report.
- Click the Add data button in the top bar.
- Select My data sources and then choose the saved data source.
- Click Add and confirm your selection by pressing Add to report.
How to Troubleshoot Common Data Refresh Issues
Even Looker Studio power users might run into glitches when refreshing their data. If your Looker Studio report shows outdated data, here’s how to fix it:
- Refresh data fields manually.
- Make sure Looker Studio has permission to access updated data from the connector.
- Check to see if data in the connector has any structural changes.
Here’s a quick checklist to solve the most common data refresh issues:
| Data Refresh Issue | Troubleshooting |
|---|---|
| Finding latest refresh timestamp | Check the data to see if it seems current. Then make sure the data connector is linked to your Looker Studio account. |
| Can’t refresh fields | Go to data source settings, choose Refresh fields, and wait for the connector to update. |
| Reconnecting data sources | If data refresh issues persist, choose your data source, disconnect it, then reauthorize it. |
| Authentication error | Log out and log back into your Looker Studio account. If this doesn’t work, disconnect and reauthorize the connector. |
| Data doesn’t refresh | Clear your browser cache, disable third-party extensions, or try viewing the report in Incognito mode. |
Avoid Common Data Refresh Mistakes
To keep reports error-free, get to know the key Looker Studio data freshness features and common issues
Manual Refresh Issues
Manual data refreshes in Looker Studio depend on the freshness settings of data sources themselves. To make sure your reports reflect the most current data:
- Check data freshness settings – check and adjust the data freshness settings for each data source to match your reporting needs.
- Manually refresh data – use the Refresh data option to update data before the cache expires.
Heads up: Looker Studio caches data to boost performance, which may cause delays in showing the latest data.
High Refresh Rates
Too many data refreshes over a certain period can raise costs, hit API usage limits, and strangle data flow. To set spot-on refresh rates:
- Check data stability – figure out how often your data changes and set auto-refreshes to match.
- Weigh performance vs. costs – match refresh rates with your reporting needs, but also look at related costs and API limits.
For example, a 12-hour refresh interval for data sources like Google Analytics is standard, as the data typically updates daily.
Broken Fields From Modifying Data
If you don’t refresh fields after changing data sources, you’re headed for broken reports. To avoid the Data Set Configuration and other error messages:
- Always refresh fields after any source changes with the Refresh Fields option on your connector page.
Auto-Refresh vs. Data Freshness
These two separate features often confuse users:
- Auto-refresh updates your report’s visual display with the latest available data (Pro subscription feature only).
- Data freshness controls how often Looker Studio actually fetches new data from your connectors (available to all users).
Here’s what happens in practice: If data freshness is set to hourly updates but auto-refresh runs every five minutes, your report refreshes visually every five minutes but only gets new data once per hour. The other five-minute refreshes simply redisplay the same data.
What to Know About Looker Studio’s Refresh Limitations
Looker Studio’s main strength is its suite of powerful visualization features. On the other hand, its restrictions on data processing and refresh frequency can limit its reporting capability:
| Fixed refresh intervals | -Google Analytics and ad platform connectors have pre-set data refreshes. –Free Looker Studio users have limited data refresh options. -Pro users get more frequent updates, but real-time data is still limited. |
| Real-time reporting constraints | -The free version lacks real-time refresh capabilities. -Pro users experience faster updates but still face API-related delays. -Some data connectors, like Google Ads and Facebook Ads, restrict real-time data access. |
| Complex dataset performance issues | -Large datasets with multiple joins and complex calculations slow down refresh rates. -Excessive data blending queries often break reports. |
Get more guidance on Looker Studio limitations.
Bottom Line: Balance is Everything
To get a handle on Looker Studio data freshness, users have to find that sweet spot—keeping reports up-to-date without compromising too much on performance or costs.
Learn the differences between data freshness, scheduled refreshes, manual updates, and auto-refreshes. This makes it easier to pinpoint the best settings for your reporting needs. With this knowhow, you can skillfully use data to make better, smarter, faster marketing decisions.
Match refresh intervals to actual data needs, avoid pitfalls, and use the other tips in this guide to provide clients with timely, actionable insights.
Show clients fresh data without lifting a finger.
Start Your Free Trial Today